Wednesday, December 11, 2013
P3D Extension 2 - Isos look AWESOME!
I recently loaded the Extension 2 update for P3D on my machine and then proceed to run some isos... Very nice output! What was taking 3 isos for a line is now fitting onto one and with very little cleanup afterwards. Very nice work Autodesk! Much improved! I am currently only generating isos so I am curious to see what else is improved.
Wednesday, December 4, 2013
AU 2013 is almost over...
Had a great turn-out at my AU session today! I am enjoying the networking and learning some great things for P3D. If you have never been to AU, make sure you go next year. One day left!
Thursday, November 21, 2013
PD2297
Well.... my Autodesk University class has passed the 150 registered attendees mark. That's exciting! There's still a little room left.
PD2297 - AutoCAD Plant 3D Tricks of the Trade
https://events.au.autodesk.com/connect/sessionDetail.ww?SESSION_ID=2297
Go sign up! I'll see YOU in Vegas!
PD2297 - AutoCAD Plant 3D Tricks of the Trade
https://events.au.autodesk.com/connect/sessionDetail.ww?SESSION_ID=2297
Go sign up! I'll see YOU in Vegas!
Monday, November 4, 2013
"Title Block"
If you make any templates for AutoCAD Plant 3D, the thing I have learned is always make the block name "Title Block". Not sure why it is so important but it is. Location is important too. Ortho and Iso Templates need to be in specific locations within the project. Look at your default project and make sure you follow those same general paths for your output file templates.
Monday, September 16, 2013
New Closed Valve Symbol in P&ID
The scenario was we needed a Normally Closed Diaphragm valve symbol and it was not there.
Here is the procedure to add it.
Go to the Project's PROJSYMBOLSTYLE.DWG and insert the "open" valve symbol.
Explode the symbol and block it to the new name... in our case it was PIP DIAPHRAGM VALVE (CLOSED)
Open the new block in Block Editor and hatch using Solid to fill in.

Delete the block from the view (do NOT purge) and save and close the PROJSYMBOLSTYLE.DWG
Open Project Setup of the current project and ADD a new symbol to the Diaphragm Valve
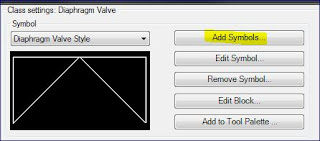
Create the NEW name of the Symbol... again in our case it was DIAPHRAGM VALVE CLOSED STYLE. You'll see it below but do not set that as your default symbol.

Lastly, go to the PnIDPart.XML and edit the file to have it place the CLOSED valve instead of the OPEN valve. See below. I use Notepad ++ to edit XML files.

Close out Plant 3D /P&ID and reopen to see changes take effect.
AU 2013 Registration has opened up!
Sign up for the PLANT 3D classes (CLICK HERE!)
Including my class "PD2297 - Autodesk® AutoCAD® Plant 3D: Tricks of the Trade" on Wednesday at 2:30PM!
In this class, we share some of the tricks we have learned over the years for working with AutoCAD® Plant 3D software. We cover various ways to route pipe, including rolled offsets, L2P, sloped, “F” as you go, elevations, and compass settings. We teach you to create equipment templates and use Viewports in Plant 3D modeling. We cover X-ray view, layer and template options, and iso messages and breaks. We explain the model symbols, such as triangles, pluses, inverted triangles, arrows, and the red line of connectivity. Finally, we cover the proper method of making line and inline asset size changes.
See you in Vegas!
Friday, August 16, 2013
Python Script - I found a new item to be careful about.

B=18
I kept having my B length on my component in the model being shifted anytime I drug the adjusting arrow to and odd value or typed in an odd value (like 15, or 16.75) It would either over adjust or not move at all. Then I tried this...
B=18.0
All worked fine after that! You have to have the ".0" in the value to allow for non-whole numbers. This was a simple thing but I found no documentation on it and really just figured it out by trial and lots of error.
Happy Scripting!
----------------
Acts 1:8
New Extension 1 for P3D 2014
The NEW Extension 1 for P3D 2014 on the Subscription Site is getting a lot of complaints on the boards and blogs. However, I have experienced no issues at all with it. So, as always, fully test it out on a machine or 2 before pushing company-wide. But as for me... I like it! Good stuff!
________________________________________________________________
________________________________________________________________
Acts 1:8 "But you will receive power when the Holy Spirit has come upon you,
and you will be my witnesses in Jerusalem and in all Judea and Samaria,
and to the end of the earth."
Monday, July 8, 2013
Is it Live or is it MemoreX-Refs?
We use XRefs a lot here where I work and I tend to have to search for my lines that are not in the XRefs so I can work on them. I found a good way to highlight the active lines in a DWG from the XRef'ed lines.
This is using a SHADED view option (my standard while modeling)


This is using a SHADED view option (my standard while modeling)

As you can see it is hard to tell what is XRef'ed and what is live and editable in the current DWG.
This is the same model but swapped to SHADES OF GRAY and you can really see the highlighted lines ready to be edited. Try it out!

This only works in PARALLEL view - not PERSPECTIVE view. (View Cube Setting)
________________________________________________________________
Acts 1:8 "But you will receive power when the Holy Spirit has come upon you,
and you will be my witnesses in Jerusalem and in all Judea and Samaria,
and to the end of the earth."
Thursday, June 27, 2013
Autodesk University
I'll be teaching a plant3d tricks of the trade class at AU this year! Sign up!
http://au.autodesk.com/
________________________________________________________________
PD2297 - AutoCAD® Plant 3D Tricks of the Trade
http://au.autodesk.com/
________________________________________________________________
Acts 1:8 "But you will receive power when the Holy Spirit has come upon you,
and you will be my witnesses in Jerusalem and in all Judea and Samaria,
and to the end of the earth."
Thursday, May 2, 2013
Ortho Improvements!
One of the biggest complaints I heard about when dealing with Ortho's was the naming of the view. If you forgot to name it before creating it, you were stuck with "Unnamed View". Fixed!
 Now a right-click on the view will give you an option to rename and edit the view from the Project Manager Palette.
Also, the name is automatically created for you now as "Front View" or "Right View" so you don't have to remember or have to go back and change it.
 Another great improvement to the Ortho portion of P3D.
________________________________________________________________

Also, the name is automatically created for you now as "Front View" or "Right View" so you don't have to remember or have to go back and change it.
________________________________________________________________
Acts 1:8 "But you will receive power when the Holy Spirit has come upon you,
and you will be my witnesses in Jerusalem and in all Judea and Samaria,
and to the end of the earth."
Thursday, April 25, 2013
Locking down the project properties
This works... Use it so configurations to your project don't "randomly" change.

This is from the Ascent Manual - Introduction to Plant Design 2012
Monday, April 8, 2013
P&ID and Plant 3D 2014 is here!
Go get the 30-day trial here--> http://www.autodesk.com/products/autodesk-autocad-plant-3d/free-trial
Wednesday, April 3, 2013
New items from Python Scripting
Recently I created some additional items in Python Scripting to eliminate the time consuming task of stick-building them. Each of these takes about 5 seconds to place and adjust.
1. Round Tank Handrail
2. Tank Support Lugs
3. Tank Support Legs (I-Beam and Pipe)
4. Horizontal Tank Saddles
Learn Python and get busy!

1. Round Tank Handrail
2. Tank Support Lugs
3. Tank Support Legs (I-Beam and Pipe)
4. Horizontal Tank Saddles
Learn Python and get busy!

________________________________________________________________
Acts 1:8 "But you will receive power when the Holy Spirit has come upon you,
and you will be my witnesses in Jerusalem and in all Judea and Samaria,
and to the end of the earth."
Monday, March 25, 2013
Plant 3D and Showcase!
Playing around with a P3D model and Showcase... I like!


________________________________________________________________
Acts 1:8 "But you will receive power when the Holy Spirit has come upon you,
and you will be my witnesses in Jerusalem and in all Judea and Samaria,
and to the end of the earth."
Python Scripting!
Python Scripting!
Oh, how fun this is now... Oh, how horrible it was before figuring it out. Documentation on this was scarce but if you dig around enough, you will find some stuff that is useful.
What is Python Scripting?
In P3D, you can generate parametric 3D objects to use in your specs and catalogs. I have been making all kinds of aux steel supports for our Piping Design group. The one below is a Beam with an Angle Trapeze. The beam and the angles are all adjustable in size and the lengths, heights, and widths are adjustable as well. This support is placed using the existing pipe and adjusts for the pipe diameter.

You start with a PY file. This is the native Python file (which by the way, the name came from Monty Python). You write code using a Python Editor. I use this one:

You can find it at http://www.python.org/. You might even need a decompiler if you are trying to edit the PYC (compiled PY files) that you can find in the Content folder hidden in the VARIANTS.ZIP file under CPAK Common. The decompiler is found at https://sourceforge.net/projects/easypythondecompiler/
Your code needs to have certain items in order for it to work. This was the most irritating thing of the entire process because I found no COMPLETE documentation on this process... so, I guess this is the first blog to include it.
First, you need the "import" information. If you plan to use any math functions (like tan, cos, sin, pi) you need to import them into your code. The highlighted yellow portion is your import. I put it at the top of my code.


Next, write your code. Use this link to get some good info on what the code should consist of. https://knowledge.autodesk.com/community/article/316796
Once you write your code, test it in Plant 3D. For info on how to test, go to this link: https://www.autodesk.com/autodesk-university/class/Scripting-Components-AutoCADR-Plant-3D-2012 Download the HANDOUT(.DOC) in the upper right corner. (Thanks Dave Wolfe!)
After testing, then add to your AutoCAD Plant 3D Catalog. I created a separate Supports Catalog for my custom items. Then add them to your PROJECT'S PipeSupportsSpec.pspx. I Cap'ed and Bold PROJECT'S because that is another one of those things that will stump you. Each project has a set of specs, including the PipeSupportsSpec.pspx file. Make sure you add it there!
If you have any questions, email me. jh2008jh@gmail.com
Enjoy!
Oh, how fun this is now... Oh, how horrible it was before figuring it out. Documentation on this was scarce but if you dig around enough, you will find some stuff that is useful.
What is Python Scripting?
In P3D, you can generate parametric 3D objects to use in your specs and catalogs. I have been making all kinds of aux steel supports for our Piping Design group. The one below is a Beam with an Angle Trapeze. The beam and the angles are all adjustable in size and the lengths, heights, and widths are adjustable as well. This support is placed using the existing pipe and adjusts for the pipe diameter.
How is this done?You start with a PY file. This is the native Python file (which by the way, the name came from Monty Python). You write code using a Python Editor. I use this one:

You can find it at http://www.python.org/. You might even need a decompiler if you are trying to edit the PYC (compiled PY files) that you can find in the Content folder hidden in the VARIANTS.ZIP file under CPAK Common. The decompiler is found at https://sourceforge.net/projects/easypythondecompiler/
Your code needs to have certain items in order for it to work. This was the most irritating thing of the entire process because I found no COMPLETE documentation on this process... so, I guess this is the first blog to include it.
First, you need the "import" information. If you plan to use any math functions (like tan, cos, sin, pi) you need to import them into your code. The highlighted yellow portion is your import. I put it at the top of my code.

Then you need the "@activate" and "@param" information. The @activate is the name of your PY file or how you want it to show up in the spec and catalog of Plant 3D. Circled in RED is the one piece that had me stumped for a week and to why my code would not work or import into the catalog. It is a simple "Ports=X" entry. I could not find any documentation on this needing to be there so... you're welcome! The @param is the list of parameters you want to show up in the Properties Dialog in Plant and also the items to fill out in the catalog. These show =LENGTH only but you can use an =STRING if your entry is just a number, letter, or anything other than a length value. Also, you can use =ANGLE for an angle value.

Next, write your code. Use this link to get some good info on what the code should consist of. https://knowledge.autodesk.com/community/article/316796
Once you write your code, test it in Plant 3D. For info on how to test, go to this link: https://www.autodesk.com/autodesk-university/class/Scripting-Components-AutoCADR-Plant-3D-2012 Download the HANDOUT(.DOC) in the upper right corner. (Thanks Dave Wolfe!)
After testing, then add to your AutoCAD Plant 3D Catalog. I created a separate Supports Catalog for my custom items. Then add them to your PROJECT'S PipeSupportsSpec.pspx. I Cap'ed and Bold PROJECT'S because that is another one of those things that will stump you. Each project has a set of specs, including the PipeSupportsSpec.pspx file. Make sure you add it there!
If you have any questions, email me. jh2008jh@gmail.com
Enjoy!
________________________________________________________________
Acts 1:8 "But you will receive power when the Holy Spirit has come upon you,
and you will be my witnesses in Jerusalem and in all Judea and Samaria,
and to the end of the earth."
Subscribe to:
Comments (Atom)